Showing posts with label free patterns. Show all posts

15 February 2014

Knit a Daffodil for Irish Cancer Society


Last year my mum, myself and lots of lovely local ladies knit up lots of lovely daffodils which we then sold on Daffodil Day for the Irish Cancer Society (full details here)   It was a huge success, so much so that this year the Irish Cancer Society have asked me to make the pattern available for more people to get involved.


Daffodil Day is a yearly event in Ireland whereby daffodils are sold in order to raise money for the Irish Cancer Society.  You can find out lots more information here on their official website and how you can get involved in fundraising.    This year's Daffodil Day is on 28th March and we would love you to get involved, by stitching some lovely daffodils that will then be sold to raise money for the Irish Cancer Society.


How do you get involved?  

Simple.  Use the pattern below to knit the daffodils.  (There's a pdf version at the end of this post with step by step pictures and instructions).  Then when you have your daffodils knit up you can liaise with your local community fundraiser as to where you drop off the daffodils for selling on Daffodil Day.  You can find your local fundraiser by calling the free phone number 185060660

In Roscommon (Ireland) we are asking you to knit and make up your daffodils, then place them in a plastic bag (ideally with your name and the amount of daffodils you knit written on a piece of paper in the bag) and drop them off to the Coffee Morning on 14th March in JJ Harlows Bar, The Square, Roscommon.   They will then be sold on Daffodil Day (28th March).   If you are outside Ireland and wish to take part that would be fantastic, simply comment below with your email or email me direct at michlle AT michellemadethis DOT com and I can give you my address to post the daffodils to).

If you have any questions at all please feel free to comment below and I will get back to you as soon as possible.  In the meantime let's get stitching!!


All you need to get started is:

Green DK (double knit) wool
Yellow DK (double knit) wool
Knitting Needles (4mm)
Safety pins 
Darning Needle

The pattern is as follows:

To make the daffodil

*Cast on 2 stitches (Yarn A)
Inc1 (by knitting into the front and back of the stitch) at beginning of each row until you have
11 stitches
Break yarn* and place on spare needle or holder.
Repeat from * to * 4 more times until you have 5 petals.
Knit across all 5 points
You should have 55 stitches in total
Knit 2 rows
K2tog, K1 (28)
K2tog (14)
K2tgo (7)
Cut thread and use tail to thread a darning needle.  Insert the needle through the stitches and secure. This forms the flower.
You will need to sew a few stitches to join the last petal with the first.
Then weave in all the end.  It is essential that you weave the ends in and do not simply snip them off as it will not look as neat and is likely to unravel.

This pattern is an original, copyrighted design. Please do not reproduce or distribute without
first obtaining permission. I am happy for items knitted from this pattern to be sold for charity
fund-raising but please do not knit up for commercial purposes (ie to sell for personal gain).
© copyright michellemadethis 2013 All rights reserved 

To make the trumpet

Cast on 14 stitches (YA)
Knit 4 rows
Cast off tightly (the cast off edge will be the bottom part of the trumpet that you will stitch to the daffodil)
Join short sides together to form trumpet and sew in centre of petals

To make the stem

Cast on 20 stitches (Yarn B)
K 3 rows
Cast Off
Sew long sides together. 

To make up

Attach the trumpet to the centre of the petals  
At the same time you can attach the stem to the back of the petals and then stitch a safety pin in place so it can be worn as a brooch. 

This pattern is an original, copyrighted design. Please do not reproduce or distribute without
first obtaining permission. I am happy for items knitted from this pattern to be sold for charity
fund-raising but please do not knit up for commercial purposes (ie to sell for personal gain).
© copyright michellemadethis 2013 All rights reserved 


A few tips and tricks on making the daffodils

  • Kniting a complete daffodil and sewing it together takes approximately 45 minutes and I wouldn't say I am a very fast knitter. 
  • I find knitting as many petals as I can on circular needles makes the process a little quicker. 
  • If you are in a knitting group why not share it out.  1 person could knit stalks, 1 person could knit petals, 1 person could knit the trumpets and another person sew them up?
  • We used small safety pins as the brooch part and they are just fine.  You can buy them very cheaply in discount stores or 2 euro shops. 
If you have any other comments, tips or tricks feel free to comment below.


Please make sure you have an up to date version of Adobe.  You can download it for free here 

Alternatively you can download the file from ravelry (no need to be a member)  HERE 


KEEEEEEEEP STITCHING  :O) 


**** addition to origial blog post 24th Feb 2014 *****

I am thrilled to say that since posting this I have had lots of people getting in touch saying they are going to knit the daffodils which is fantastic.  I have also had people asking for a crochet pattern.  I am delighted to say that I have one for you.

The lovely Lucy from the beautiful blog Attic24 has given permission for her crochet daffodil pattern to be used for the purpose of selling along with our knitted daffodils on Daffodil Day.


You can find the pattern and step by step instructions on how to crochet the daffodil here.

Thank you to everyone for taking part in this :O)


23 January 2014

Baby bonnets and nieces


I'm sure I'm not the only one who buys fabric with no plans whatsoever for what I'm going to make.  I just like the colour, the print or the feel of it or something really simple like that and basically I've just got to have it.

Often this fabric then sits in a neatly folded pile on my shelf in my craft room until I have a eureka moment. 

I had one of those very moments last week. 

I saw this tutorial and knew straight away what fabric I was going to use to make it. 

A few hours later (really easy to follow pattern) I had my first little bonnet made.  


I love it !

But it wasn't for me ... it was for my gorgeous little niece Sienna Ella. 

I think you'll agree it suits her.  


Watch this space - I have a feeling there will be lots of baby/cute/girly items being made at the cottage from now on.  

My first time being an Auntie and the icing on the cake is that I'm godmother too - beyond excited :O)  

If you have any baby patterns you've made recently let me know in the comments, would love to see

17 March 2012

Beannachtaí na Féile Pádraig / Happy St Patricks Day


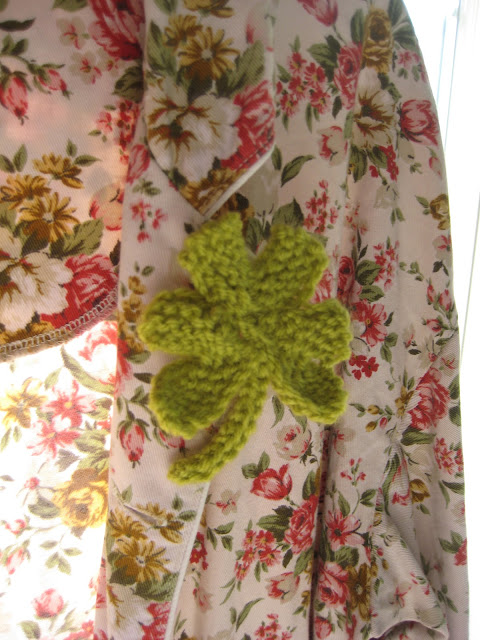
I'm wearing my shamrock today, are you?

For those of you who've missed it, today is 

Saint Patricks' Day.  

Saint Patrick is the patron Saint of Ireland. 

It's funny, now that I'm back in Ireland it's not such a big day but when I lived in London and New York it was a huge day for me!  My favourite Saint Patrick's Day has to have been when I worked in a law firm in London and I was asked to organise a party for the whole office.  I cooked bacon and cabbage for them all and got to order in Irish cheese and taytos and even kegs of guinness.  Yeah I'm wondering too ... why I left that job too ? 

Ok  I digress - surely you're used to me by now?  :O)

Right, shamrocks ...  do you like my corsage?

Well, because i'm feeling so proud to be Irish and as we are known for our generosity and friendliness and all the rest I'm sharing my pattern with you, hot off the press!
 

I say 'hot of the press' as I only just came up with this this morning!

Here goes ...

Grab yourself some green wool/yarn
I used double knit (DK) in a lovely mossy green colour
I used size 12 needles but if you don't have them use whatever you have - bearing in mind the bigger the needle, the bigger the shamrock!

Are you ready?
Cast on 16 stitches
Row 1  - K 
(for each knit row, knit into the back of the first and last stitch to make it neater)
Row 2 - K6, SSK, K2tog, K6
Row 3, 5 - K
Row 4 - K5, SSK, K2tog, K5
Row 6 - Cast off

This makes one leaf of the shamrock, you need three for the corsage (or four if you're feeling like you need some luck!)

For the stem I just cast on 12 stitches and knit 3 rows.  Then cast off, thread the end of the yarn into a darning needle and sew the long edges together. 
 

Once you have sewed all the leaves together you can sew on a brooch pin and wear with pride :O)


I don't know about you but I'd much rather see people wearing these as opposed to tacky "Kiss me I'm Irish" t-shirts and leprachaun hats.

And for the record .... I don't know anybody in Ireland that has EVER said "top of the morning to ya".   


Have a lovely St Patrick's Day

M x

17 June 2011

Everything's rosey


This is my all time favourite flower in my garden. 
Actually it's not really in my garden. 
It grows along the boreen (aka driveway) down to my cottage.  
I have no idea what it's called but it's been here for as long as I can remember.  It's got the most beautiful scent and is always blooming with flowers.  I've tried countless times to get something similar in the garden centre but nothing matches up to it. 

Then ... last week, for my birthday
(by the way thank you so much for all the birthday wishes)
 I got this  ...


The roses are just as pink and gorgeous
and the scent as heavenly. 

Yes I know, I'm VERY lucky :O)

Inspired by the pink roses I've been knitting some to make into corsages


and making some new cushions
currently available to buy in Future Flowers in Roscommon. 


If you fancy knitting some roses too
here's a quick pattern I've come up with ...

 I used scrap pieces of DK (double knit) wool and 4mm needles but use whatever you have got.  The chunkier the wool the bigger the rose.

Cast on 100 stitches
Row 1 - Knit
Row 2 - Purl
Row 3 - Knit
Row 4 - Purl
Row 5 - Knit
Row 6 - Purl
Row 7 - Knit two together (leaves you with 50 stitches)
Then just cast off.

To shape the rose roll it together quite loosely and try not to be too perfect with it.  Then just stitch together at the back.  I'm working on a leaf pattern so I'll come back with that soon.  Of course there are umpteen patterns available online if you do a quick search for "knitted leaves". 

Enjoy! 

Let me know how you get on and have a lovely weekend x

16 November 2010

Ready to drop !


What a week and it's only Tuesday!

I think I've moved every piece of furniture in the cottage, well almost!  I've had a major clearout and tidy up and finally have a designated room for all my crafts.  Pics will follow - the light is just rubbish at the mo so hopefully (eternal optimist) the sun will shine tomorrow and I'll get some pics to share with you all.   I just had to do something as my lovely cottage was being taken over and it got to the point where I couldn't even think straight!!  Ever feel like that?

This was all not helped by the fact that I've been really sick with yet another chest infection so at this moment in time as I'm sitting by the fire with a glass of wine watching (multi-tasking) Kirsties' Homemade Home I could quite easily fall asleep but I still have a few last minute things to do .

Why? I hear you ask. 
Well ....
I've got a tv crew coming to the cottage tomorrow
to film me doing some christmas crafting. 

Super super excited :o)
I'll let you know when it's due to air as soon as I find out.

In the meantime I found the pattern for the cute tea cosy in the credits to Kirsties Homemade home, you can find it here and even better it's FREE :O)

I've also found some patterns for the knitted alphabet squares here at the lovely Little Cotton Rabbits blog.


If you don't fancy knitting you could just download this free knit font from here instead :o)


Ok time to go. 

Night x

17 January 2010

Knitted Mug Cozy


I'm not really a mug fan.

In fact when I lived in New York it drove my roomate nuts as I only every wanted to have brunch in Cafe Mogador as they seemed to be the only ones in the East Village that actually served coffee in a cup!!

I digress.

However, when I saw this pic


in a magazine I decided "I want one of them" so I decided to make my own and here it is ...


I didn't have any pattern, I just winged it.


I used chunky wool and cast on 13 stitches and knit 1, purl 1 until I 'thought' it was long enough to wrap round the mug (until it measured approx.  5inches).  Then at the next row I cast off 4 stitches at the beginning and continued k1,p1 across (9 stitches)
Then I cast off an additional 4 stitches at the beginning of the next row, leaving 5 stitches and continued k1, p1 until I had a long enough bit to button through the handle.

Honestly it was so much easier than it reads!


9 January 2010

Easter Chick Tutorial


I know you're probably thinking it's a little early.  The christmas decorations are barely down and here I am talking about Easter. 

I assure you there is method in my madness.


I thought I'd share this tutorial early to give you time to make some of these gorgeous little chicks (Easter Sunday falls on 3rd April this year).  They are ridiculously easy to do and a great starter project for kids (even adults) learning to knit.


If you have any problems with the tutorial please leave a comment or email me - michelle at michellemadethis dot com.

This is a snapshot of the tutorial but it is also available to download here.


Michelle x

8 December 2009

Knitted Nativity

I started this post in September with the view of having my own nativity scene knitted by now to show you, but time just ran away with me!  Maybe next year.

So if you fancy a knitted nativity here are a few links I found to different patterns. 

Starting with my fav ... Jane Greenhowe's available here


Love this one from Alan Dart available to buy here
Unlike the others, it includes a pattern for the stable too.


This one is available from here for free
Sorry about the picture but that's the only one that was available.


This one is also free from here


7 November 2009

Snowflakes

I've been doing some 'online research' for christmas decorating ideas and thought I'd share a few of my snowflake favs so far. If you have any I'd love to see them, leave a comment on my blog or post a pic on my facebook page michellemadethis.

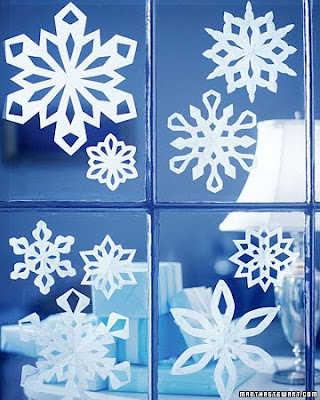
Simple paper snowflakes. Step by step instructions can be found here.


Sparkly snowflakes, perfect for jazzing up your gift wrap or hanging on the tree. Instructions
here


I LOVE these snowflake cushions, I think I might just have to make them. Instructions
here.


Some fun and easy to make christmas cards. Instructions
here.


This is just adorable ! I so want to make this too. Instructions
here.


And if you still can't get enough check out martha stewart's site for loads more ideas or click
here to see photos of real snowflakes.

1 November 2009

Free knitting patterns

If, like me, you're going for a handmade Christmas you'll love these. Not just because they will be handmade but the patterns are FREE.
Click here to download from Knitting Daily (you need to register first)


24 July 2009

Knitting + Old Movies = Heaven


After weeks, actually months, of talking about my friends pregnancies I've finally decided to put wool to needle and start knitting gifts for them. Lucy Lu is due in only 9 weeks and Karen in November! Where does the time go???
I can't share what I'm knitting in case they see them but I can show you this because it's sooooo cute & I'm in such a christmassy mood.


I knit mine whilst watching Breakfast at Tiffany's yesterday evening and started a second one as it knits up so quick.

I got the free pattern here

I've never seen the movie before and was tickled pink when I seen Audrey Hepburn knitting in it!! I would share a clip from You Tube but it's been removed from Paramount. Instead, I found this lovely print of the scene with Holly Golightly knitting instead.

It's by Ellen Lohse and you can purchase it here.


24 February 2009

Joshua's First Birthday

It only seems like five minutes ago that I was knitting a teddy and making this canvas when Joshua was born!

This weekend just gone it was his First birthday !!!

I made these for his party.

Gingerbread men and gingerbread teddy bears. The recipe is from Rachel Allens' Rachel's Favourite Food. However if you click here and scroll down the page the recipe is on her website.


I used a tube of ready made icing for the eyes and buttons and to write a 'J' on the teddy bears.


Chocolate bars with personalised wrappers.


I'm no graphic designer but if you want to save an hour or so faffing around on your computer click here to download these wrappers which you can print out on a colour printer. They're great and can be used for anything. Everyone loves to get something with their name on :o) Click here for wrappers for a standard cadburys chocolate bar.

Finally Raspberry Buns/Muffins which are deeeeelish!


The recipe is here but I've also added it to my post because you've sooo got to make these! mmmm

Makes 16 regular muffins or 24 mini muffins

Ingredients

175g butter
75g ground almonds
1½ tbsp lemon rind
140g gluten-free icing sugar, sifted
2 tbsp fine cornmeal, sifted
3 tbsp corn flour, sifted
5 egg whites, preferably free range
175g raspberries
1x bun tin lined with paper cases

Preheat the oven to 200°C/gas mark 6.
Melt the butter in a saucepan and cook until it is very light golden in colour. Mix the ground almonds, lemon rind, icing sugar and corn flour in a large bowl and pour in the melted butter.
Gently mix together. Lightly beat the egg whites in another clean bowl until they are slightly frothy, and fold into the mixture.
Pour the mixture into muffin paper cases (or use 24 petit four cases to make mini ones) and dot with raspberries.
Bake in the preheated oven for 20-30 minutes or until golden and springy to touch.
Cool on wire racks and sprinkle with extra gluten-free icing sugar before serving.

Finally, my little tip for all you keen bakers.

I was just so chuffed with myself when I did this, purely by accident. I wanted to dust my raspberry buns with icing sugar but had used the sieve for draining pasta so I opened the drawer and a tea strainer caught my eye. It's perfect! Even better it sits inside the jar so I never have to worry about the sieve being available anymore.


I just knew that tea strainer would come in useful some day ... even though I don't even drink tea.

LinkWithin

Blog Widget by LinkWithin